Showing posts with label Technique. Show all posts

Thursday, 6 October 2016

Low Key Beauty - Definition and Technique

Defintion

Low-key photography: A low-key image is one that contains predominantly dark tones and colours. Like high-key images, they convey atmosphere and mood. But where a high-key image feels airy and light, a low-key is usually dramatic and full of mystery.

Beauty: a combination of qualities, such as shape, colour, or form, that pleases the aesthetic senses, especially the sight.

Technique

Camera Settings: f/11, 1/125, ISO 200.

Lighting: fill light, beauty dish, background lights.

Equipment: tripod, snoot, colour gels, honeycomb grid, reflector dish.

Examples


Tuesday, 27 September 2016

Multiple Flash - Definition and Technique

Definition

A camera that implements multiple flashes can be used to find depth edges or create stylized images. Successive flashing of strategically placed flash mechanisms results in shadows along the depths of the scene. This information can be manipulated to suppress or enhance details or capture the intricate geometric features of a scene (even those hidden from the eye), to create a non-photorealistic image form. Such images could be useful in technical or medical imaging.

Technique


Camera Settings: f/16, 6", ISO 200.

Lighting: studio lights.


Equipment: camera, soft box lights, hot shoe, tripod

Examples


Multiple Exposure - Definiton and Technique

Definition

Multiple Exposure: In photography and cinematography, a multiple exposure is the superimposition of two or more exposures to create a single image, and double exposure has a corresponding meaning in respect of two images. The exposure values may or may not be identical to each other.

Technique

Camera Settings: 1/125, f/5.6, ISO 200

Lighting: natural lighting, soft box lighting

Equipment: tripod, soft box lights, tripod

How to Create Multiple Exposure

On the camera:

  1. Turn auto gain off.
  2. Number of shots (2).
  3. Turn multiple exposure mode on.
  4. Spot metering mode.
  5. Aperture priority mode.
  6. Focus point in centre.
  7. White out background.
  8. Take first picture.
  9. Turn up the exposure composition by two points.

In photoshop:


  1. Layer the two images.
  2. Change the top layer to 'screen'.


Examples


Tuesday, 6 September 2016

Location Portraiture - Straight Images


f-stop: f5.6
shutter speed: 1/125
ISO: 200


f-stop: f5.6
shutter speed: 1/125
ISO: 200


f-stop: f5.6
shutter speed: 1/125
ISO: 400


f-stop: f5.6
shutter speed: 1/125
ISO: 400


f-stop: f5.6
shutter speed: 1/125
ISO: 200


Location Portraiture - Image Bank


This image has used a shallow depth of field and a vignette effect in order to make the girl the focus of the image. Whilst the eyes appear to be the part of this image that is the sharpest, I feel as though the viewers focus would be drawn towards the girls mouth due to her missing teeth. This image is likely to have been taken to show that the girl has lost her teeth. With this, there are connotations of growing up as the girl has lost her 'baby' teeth and is growing her 'adult' teeth. 
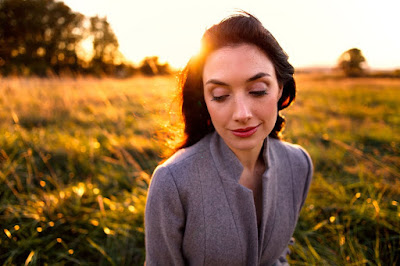

This image shows a woman standing in a field with the sunset behind her. Whilst the background is out of focus, we can still tell that the sun is setting from the golden colours throughout this image, and from how the sun is shining through her hair. This image could connote a feeling of freedom or isolation as we can see a vast amount of empty land behind her, with not another person in sight. This could make a person feel free as they feel they have escaped society, or isolated as they are the only one around. 


This picture focuses on the man by using an extremely narrow depth of field. This photographer would have used an f-stop of around f4.0 or less to create such a strong blur. There is also the possibility that the photographer edited the image in Photoshop to make it more blurred. Due to such stark contrast between the foreground and the background, this image could connote how the man feels separate from the world and how reality is blurred and distorted.  


Like the image above, this image uses an exceedingly narrow depth of field to create a contrast between the foreground and background, and to ensure that the subject of the image is the only thing that the viewer focuses on. The use of shallow depth of field could connote that she has shut out the world around her, and the way that the woman in the image is smelling the bunch of flowers in her hand could refer to the saying 'stop and smell the roses' - sometimes you need to slow down and just relax.


This image mostly uses wide depth of field, with a small portion of the background being blurred. This does not stop the viewers attention from being drawn towards the people, though, as they are central in the image and the colour of the girl's tracksuit contrasts with the dull greys and browns of her surroundings. This image connotes how the man in the image is protective of the woman, with the way he is holding her and the fact that she is sat on his lap. It also connotes this with the way he stares at the camera, almost trying to intimidate the viewer.

Location Portraiture - Definition and Technique

Definiton

Lighting on location can often influence the way a photograph is taken. A technique often used in location portraiture is adjusting the aperture to obtain a shallow depth of field. This throws the background out of focus and allows you to shoot in dimmer lighting conditions as the shutter speeds at an f-stop of around f5.6 with be fast. It is also common for photographers to shoot in manual focus whilst doing location portraiture as it allows them to get a sharp focus on the subject's eyes or face. A key part of getting a good portrait image on location is to ensure that the person in the photograph is comfortable and that you are interacting with them. This will make the image seem more natural and the image will appear less stiff and set up. Many photographers work with a tripod when shooting on location - an example photographer is Alec Soth. Examples of his work are below.

Technique

Camera Settings: f/4, 1/200, ISO 200

Lighting: natural lighting/artifical lighting within stores.

Equipment: tripod.

Examples


Tuesday, 21 June 2016

Animated Gif - Straight Image


Animated Gif - Technique

Below I will be showing the step by step on how to create a gif in Photoshop.

Step 1: ensure that all of the images you would like to use in your gif are layered.


Step 2: go to window --> timeline.


Step 3: click on 'create video timeline'.


Step 4: ensure that all of your wanted images are on the same timeline and are in the order you want them. Then set each image to however long you want it to be. For example, with my gif, I set each image to 5 frames.


Step 5: click on the settings option next to the timeline. Tick the box that says 'loop playback' so that your gif loops. You can preview your gif before saving it by pressing the play button to the left of the settings.


Step 6: go to file --> save for web. Ensure that the preset is set to 'GIF 128 dithered' (top right) and that the looping option is set to forever (bottom right). 


Tuesday, 14 June 2016

Macro - Definition and Technique

Definition

Macro: macro photography refers to the technique of taking a photograph of a small object, which will appear larger than life size in the photograph.

Technique

Equipment: camera, macro lens, table, tripod, small objects

Settings: 1/250, f5.6, ISO 200

Lighting: soft box lights

Examples


Wide Angle Close Up - Defintion and Technique

Definitions

Wide Angle: use of a shorter focal length resulting in a wider shot.

Close Up: tight framing around an object within a photograph.

Technique

Equipment: camera, tripod 

Camera settings: 1/125, f/5.6, ISO 200

Lighting: studio lights

Examples of Wide Angle Close Up